SCOM Self Service Portal

Imagine a world where server and application admins can install and maintain their SCOM agents themselves.  Imagine if they could quickly and easily create their own groups and then create new monitors and rules against them.  Imagine if they could create their own maintenance schedules and instantly put servers into maintenance mode with a click of a button.

This is all possible with the new SCOM Self Service Portal.

The new portal is built with HTML 5 and the latest web technologies and works with SCOM 2012 R2, SCOM 2016, and SCOM 1801.
Features:

  • Users can install, repair, uninstall, delete and reset agents. No longer do you have to be a SCOM admin to do this basic functionality.  Users are empowered to maintain their agents; the SCOM admin will no longer have to perform these tedious and time-consuming activities.
  • Users can create and maintain their own groups. With these groups they can then build their own event, service, and performance monitors.  They can also build their own performance collection rules.  All the difficult concepts to teach a user how to author their own monitors and rules is removed.
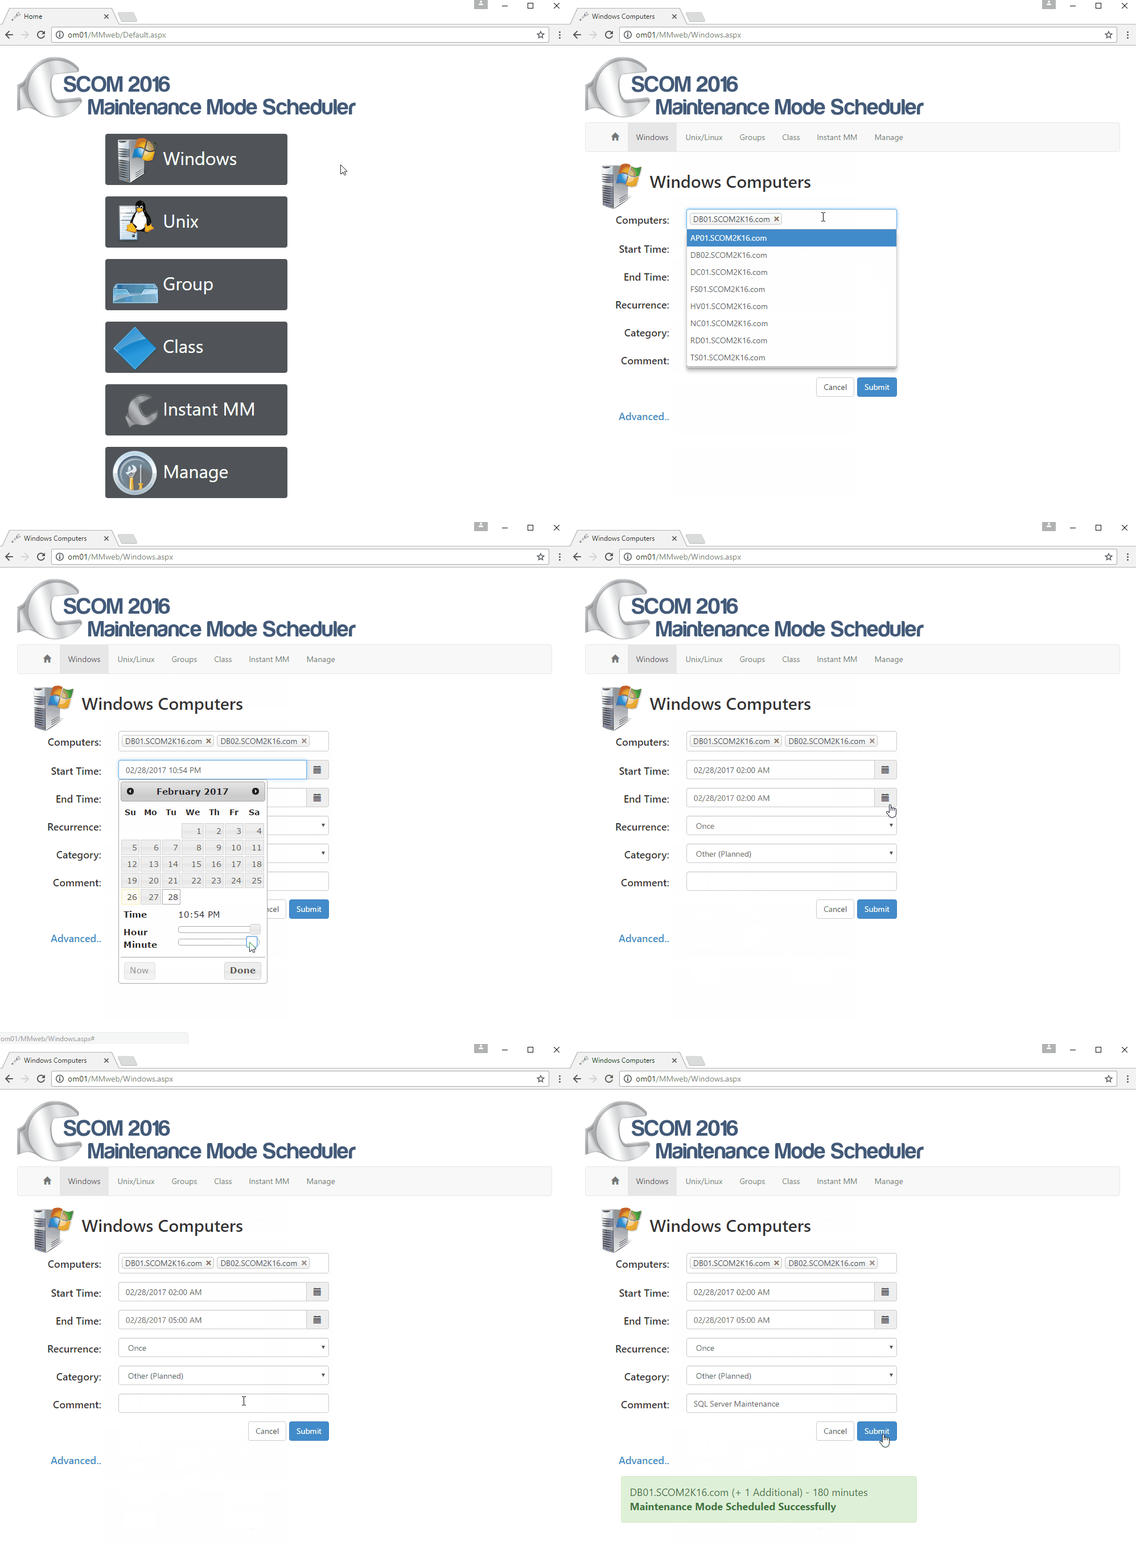
  • Users can create and maintain their own maintenance schedules from a website. Users can instantly put servers into maintenance mode without using or installing the console.  They can easily call the website from a script to use with their maintenance process.

Install Agents

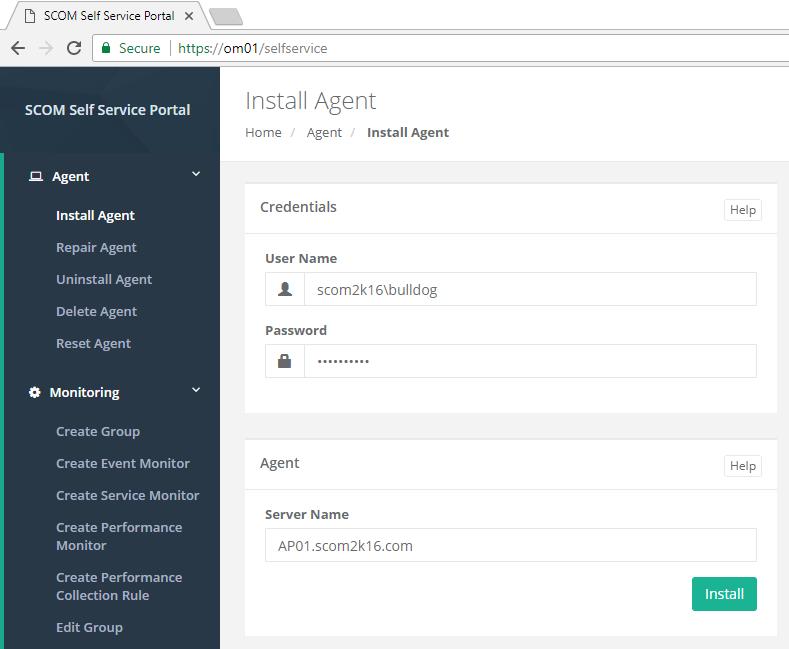
A user with local admin privileges to a server, types in their username, password and the server they want to push to.  The agent and the latest installed update roll-up are pushed from SCOM to their server.
Delete Agents

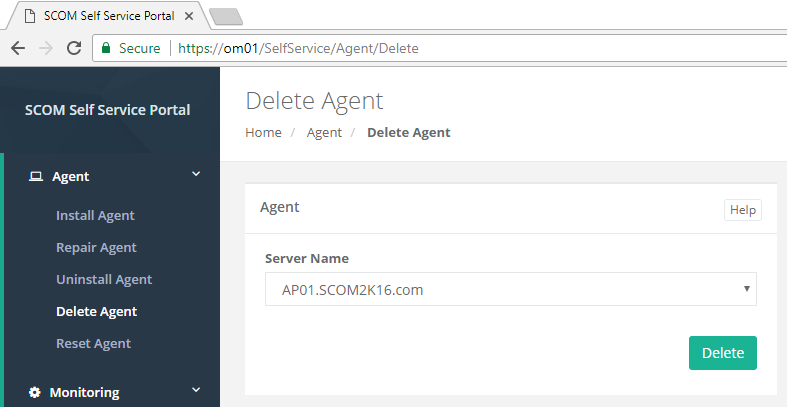
An application or server admin can now delete their servers out of SCOM after they have decommissioned their server.  No longer having to get the SCOM admin involved.

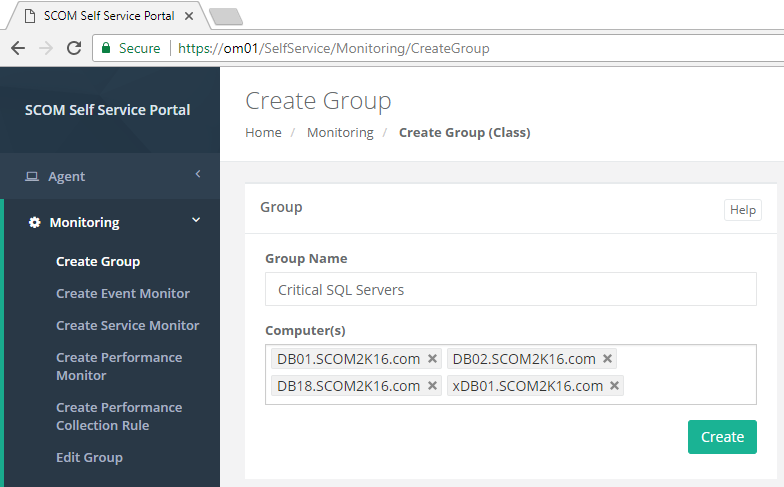
Create Groups

Users can now create their own groups of servers.  They can use these groups for targeting monitors and rules.

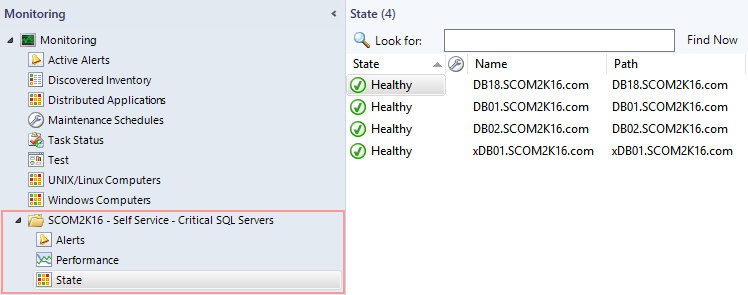
When a group is created.  A new management pack, class, and basic views for Alerts, Performance and State are created automatically following management pack best practices.

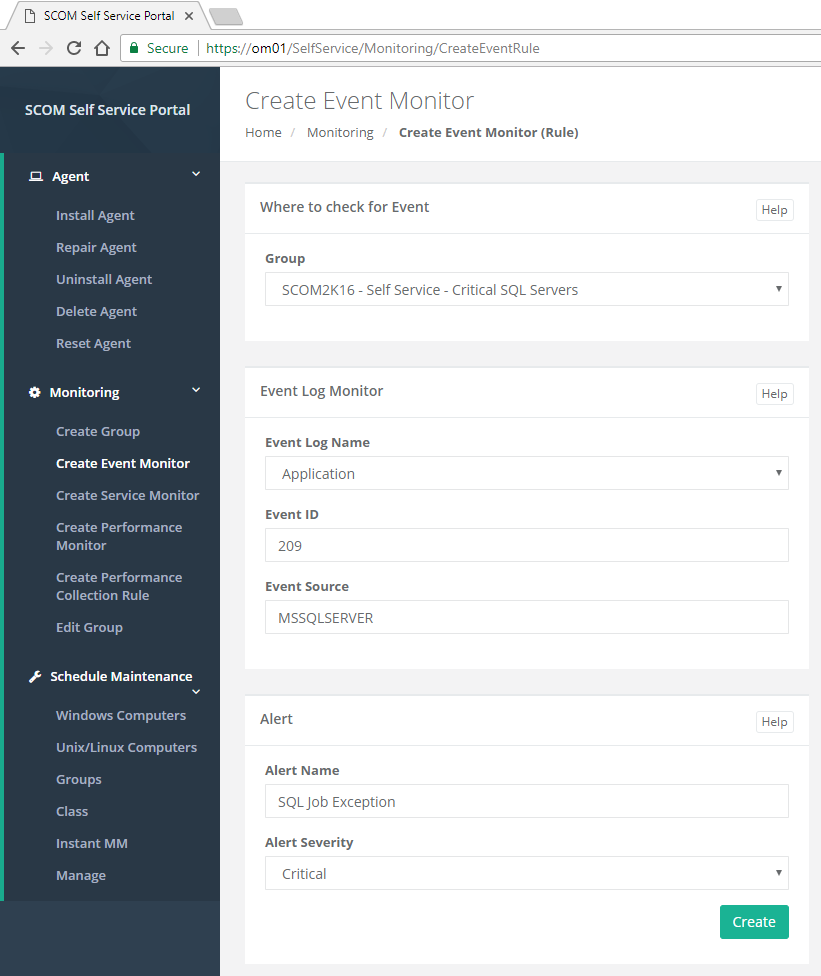
Create Event Monitors

A user can create an event monitor by selecting the group of servers they want the event monitor to run on.  Then they type in the information from the event they want alerted on.

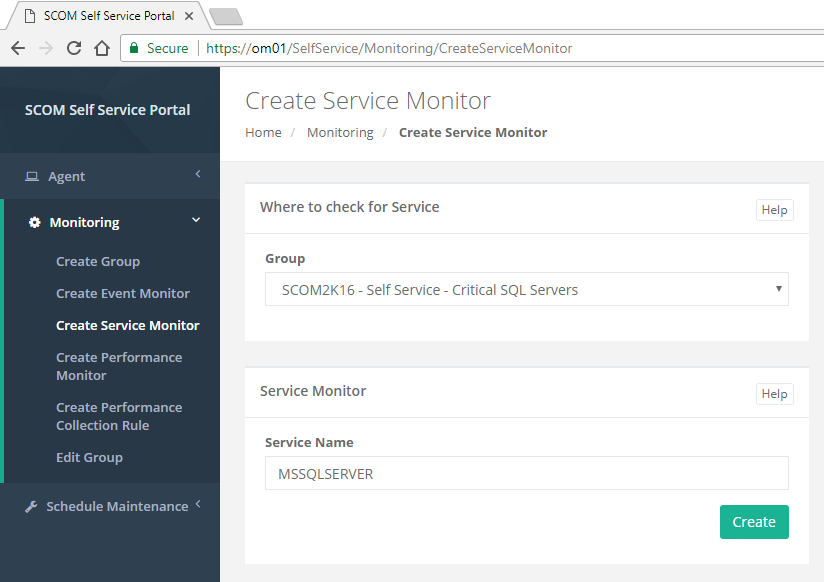
Create Service Monitors

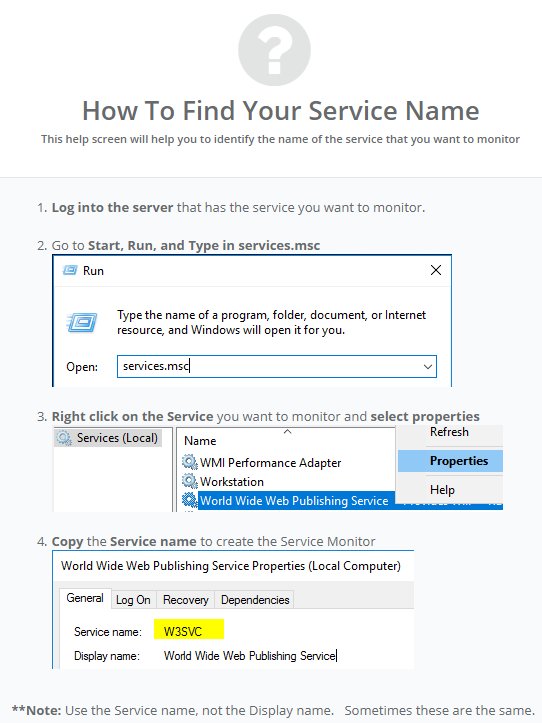
A user can create a service monitor by simply picking the group and typing in the name of the service.

Schedule Computers for Maintenance Mode

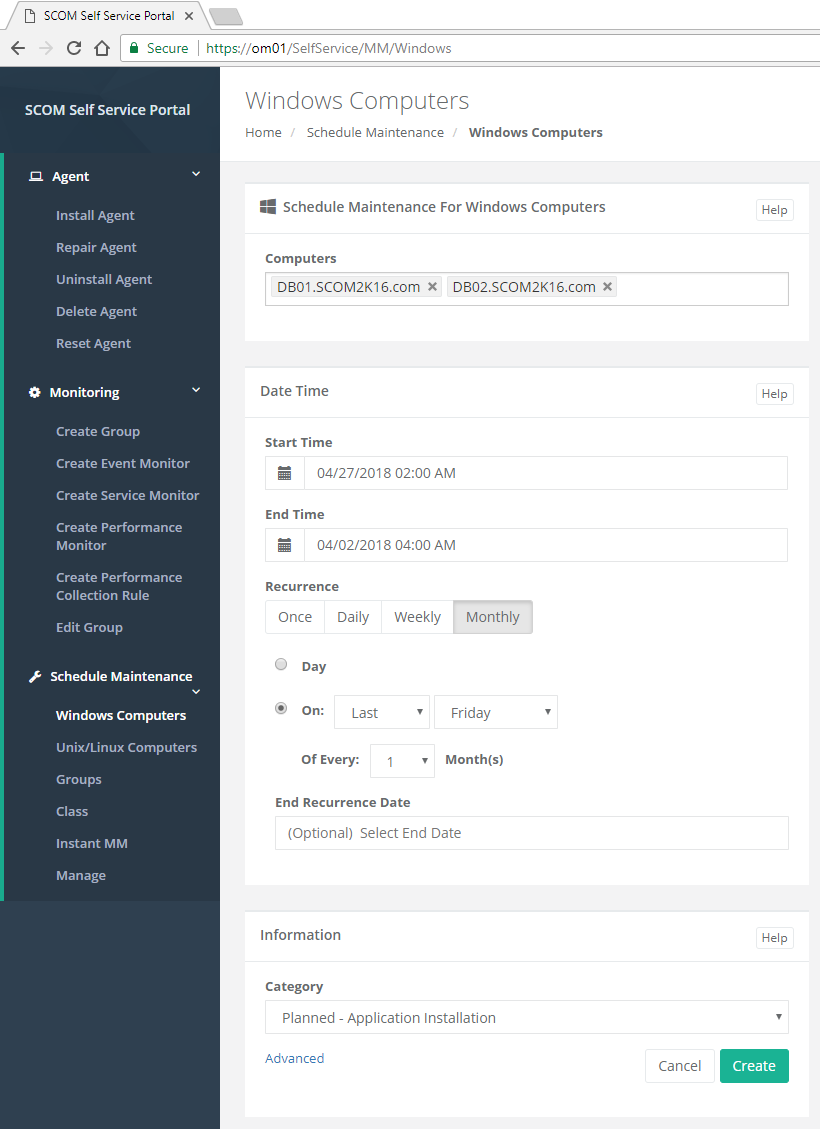
A user can schedule future maintenance on their servers.

Instant Maintenance Mode

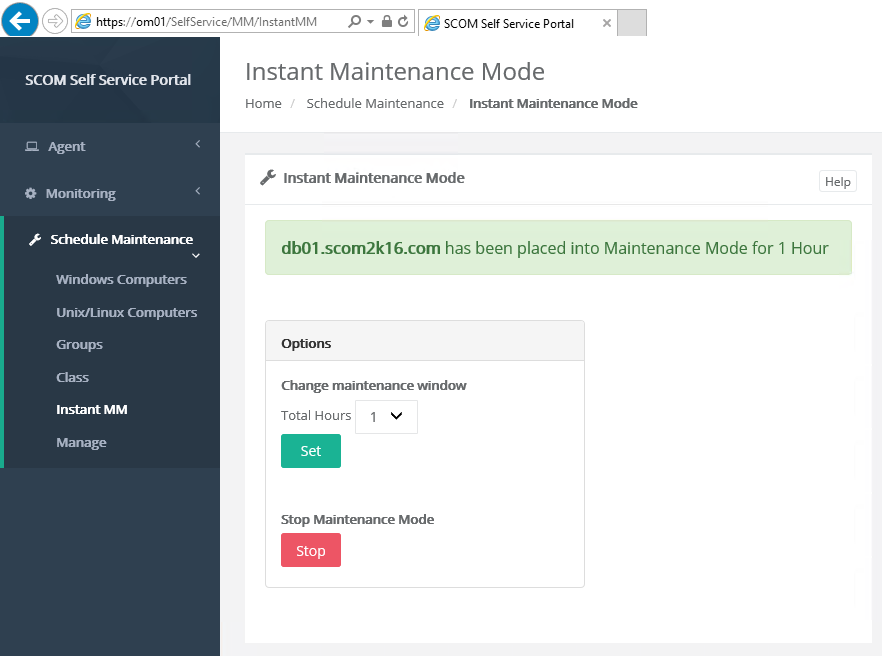
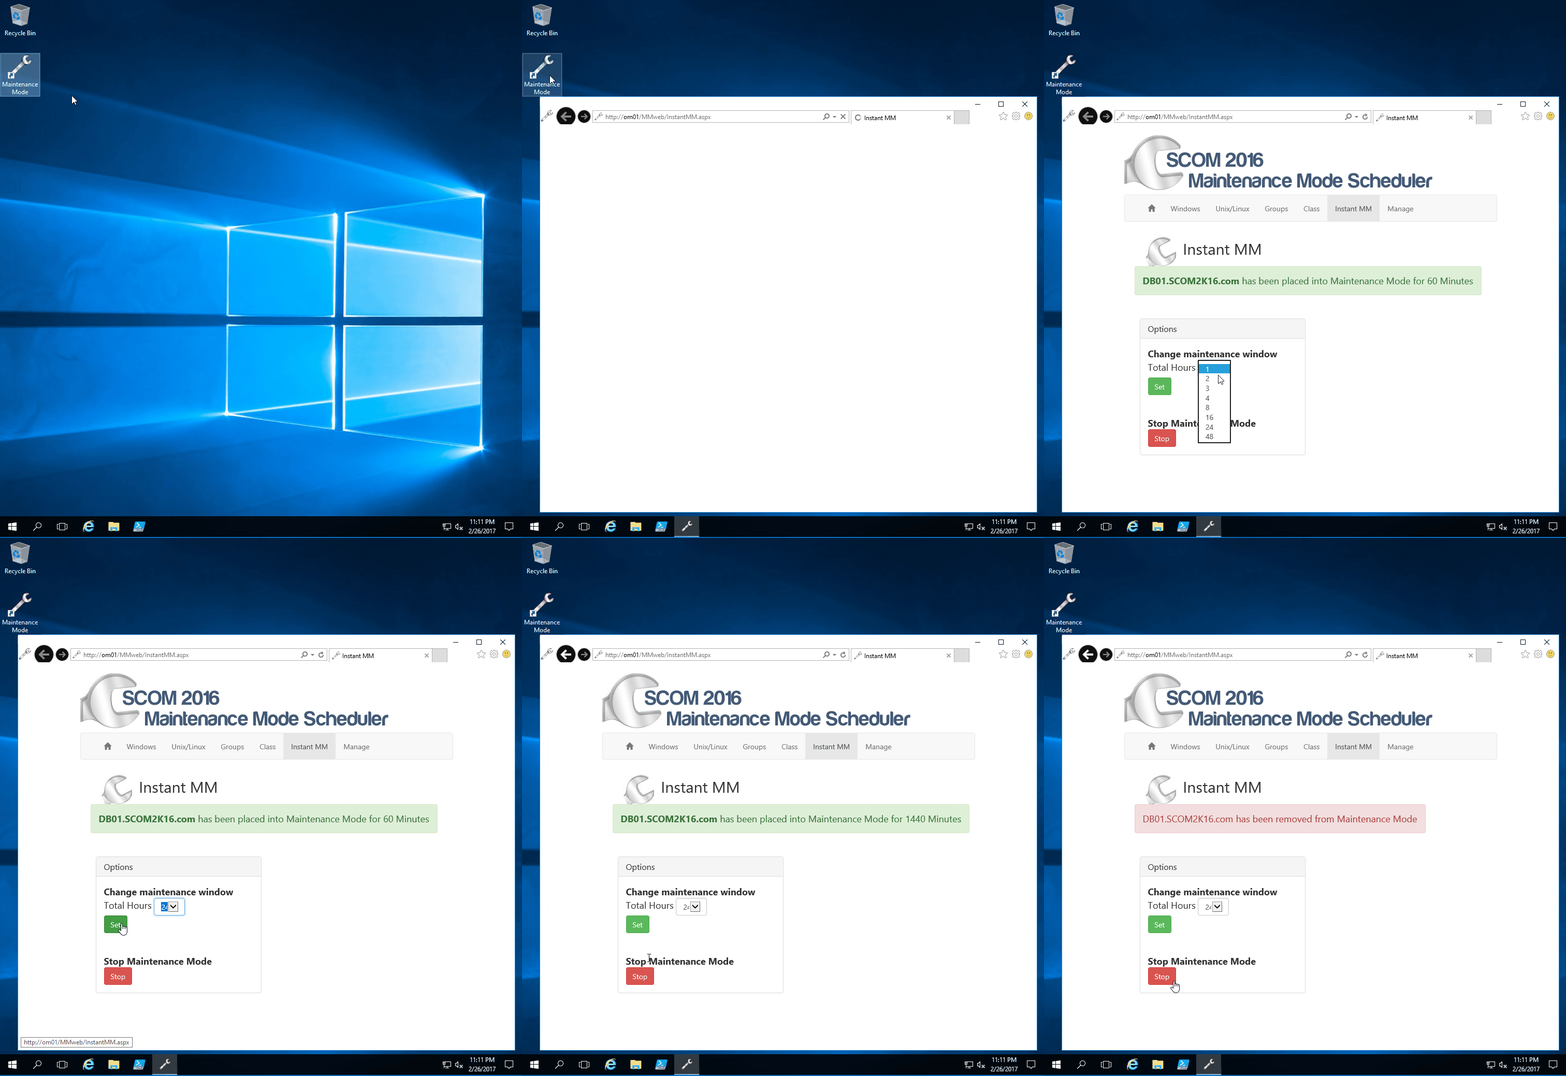
This solution makes it easy for IT staff to put a server into maintenance mode without having to go to the SCOM console. On any server, the administrator can visit the Instant MM website.

Creating a shortcut on the desktop of the servers can make it even easier.  With one click a server will be put instantly into maintenance mode.

Help Screens on every page

Anytime a user is confused or needs help.  They can click the help button on any screen to get detailed help.

Any ideas, problems, bugs, or issues please e-mail: support@scom2k7.com  or visit the user voice site https://scom2k7.uservoice.com
Continue Reading

SCOM Core – Removing all the add-on management packs that make SCOM 2016 Bloated and Slow

Wouldn’t it be cool if SCOM 2016 was super fast and required less resources?

SCOM 2016 is full of legacy solutions that make it bloated and slow.  You can remove “most” of these solutions if your not going to use them anyway?

SCOM was created in a very modular fashion using management packs to add features over the years.

After careful analysis I created the following PowerShell script to remove many of the management packs that slow down SCOM.

I have broken the script into pieces so you can remove any parts that you want to keep.  The script was created using a clean SCOM 2016 install.  If you have been using SCOM 2016 for a long time or have an upgraded SCOM environment you may have some additional dependencies in unsealed MPs you created.

If you find you need a solution in the future.  Simply add the MPs back from the installation media.

Download: https://www.scom2k7.com/downloads/SCOMCoreMPRemoval.zip

The script:

$MSServer = "yourMSServer"

Import-Module -Name "OperationsManager" 
New-SCManagementGroupConnection -ComputerName:$MSServer

#Summary Dashboard
Get-SCOMManagementPack -Name "Microsoft.SystemCenter.OperationsManager.SummaryDashboard" | Remove-SCOMManagementPack

#AEM
Get-SCOMManagementPack -Name "Microsoft.SystemCenter.ClientMonitoring.Overrides" | Remove-SCOMManagementPack
Get-SCOMManagementPack -Name "Microsoft.SystemCenter.ClientMonitoring.Internal" | Remove-SCOMManagementPack
Get-SCOMManagementPack -Name "Microsoft.SystemCenter.ClientMonitoring.Views.Internal" | Remove-SCOMManagementPack

#Client Monitoring
Get-SCOMManagementPack -Name "Microsoft.Windows.Client.NetworkDiscovery" | Remove-SCOMManagementPack
Get-SCOMManagementPack -Name "Microsoft.Windows.Client.Library" | Remove-SCOMManagementPack

#OMS-Advisor - Only works if Advisor was never configured
Get-SCOMManagementPack -Name "Microsoft.SystemCenter.Advisor" | Remove-SCOMManagementPack
Get-SCOMManagementPack -Name "Microsoft.SystemCenter.Advisor.Resources.ENU" | Remove-SCOMManagementPack
Get-SCOMManagementPack -Name "Microsoft.SystemCenter.Advisor.Internal" | Remove-SCOMManagementPack

#360 Dashboards
Get-SCOMManagementPack -Name "Microsoft.SystemCenter.ApplicationMonitoring.360.SLA" | Remove-SCOMManagementPack
Get-SCOMManagementPack -Name "Microsoft.SystemCenter.ApplicationMonitoring.360.Template.Dashboards" | Remove-SCOMManagementPack
Get-SCOMManagementPack -Name "Microsoft.SystemCenter.ApplicationMonitoring.360.Template.Library" | Remove-SCOMManagementPack

#Unix-Linux
Get-SCOMManagementPack -Name "Microsoft.Unix.Views" | Remove-SCOMManagementPack
Get-SCOMManagementPack -Name "Microsoft.Unix.ShellCommand.Library" | Remove-SCOMManagementPack
Get-SCOMManagementPack -Name "Microsoft.Unix.Process.Library" | Remove-SCOMManagementPack
Get-SCOMManagementPack -Name "Microsoft.Unix.LogFile.Library" | Remove-SCOMManagementPack
Get-SCOMManagementPack -Name "Microsoft.Unix.ConsoleLibrary" | Remove-SCOMManagementPack
Get-SCOMManagementPack -Name "Microsoft.Unix.Image.Library" | Remove-SCOMManagementPack
Get-SCOMManagementPack -Name "Microsoft.Unix.Library" | Remove-SCOMManagementPack


#Windows Server Network
Get-SCOMManagementPack -Name "Microsoft.Windows.Server.NetworkDiscovery" | Remove-SCOMManagementPack

#Network Devices *Note Can get rid of Microsoft.SystemCenter.NetworkDevice.Library because of Microsoft.SystemCenter.Internal.UI.Tasks dependency
Get-SCOMManagementPack -Name "Microsoft.SystemCenter.Visualization.Network.Dashboard" | Remove-SCOMManagementPack
Get-SCOMManagementPack -Name "Microsoft.SystemCenter.Visualization.Network.Library" | Remove-SCOMManagementPack
Get-SCOMManagementPack -Name "System.NetworkManagement.Monitoring" | Remove-SCOMManagementPack
Get-SCOMManagementPack -Name "System.NetworkManagement.Templates" | Remove-SCOMManagementPack
Get-SCOMManagementPack -Name "Microsoft.SystemCenter.NetworkDiscovery.Internal" | Remove-SCOMManagementPack

#MP Recommendations
Get-SCOMManagementPack -Name "Microsoft.SystemCenter.ManagementPack.Recommendations" | Remove-SCOMManagementPack

#Baselineing Tasks
Get-SCOMManagementPack -Name "System.BaseliningTasks.Library" | Remove-SCOMManagementPack

#Process Monitoring Template
Get-SCOMManagementPack -Name "Microsoft.SystemCenter.ProcessMonitoring.Library" | Remove-SCOMManagementPack

#Summary Dashboard Template
Get-SCOMManagementPack -Name "Microsoft.SystemCenter.GTM.Summary.Dashboard.Template" | Remove-SCOMManagementPack

#Web Application Availability Monitoring - Note Many customers might still use this.
Get-SCOMManagementPack -Name "Microsoft.SystemCenter.WebApplicationSolutions.Library.Resources.ENU" | Remove-SCOMManagementPack
Get-SCOMManagementPack -Name "Microsoft.SystemCenter.WebApplicationSolutions.Library" | Remove-SCOMManagementPack
Get-SCOMManagementPack -Name "Microsoft.SystemCenter.WebApplicationTest.Library" | Remove-SCOMManagementPack

#Service Level Report Library
Get-SCOMManagementPack -Name "Microsoft.SystemCenter.DataWarehouse.ServiceLevel.Report.Library" | Remove-SCOMManagementPack


#APM
Get-SCOMManagementPack -Name "Microsoft.SystemCenter.Apm.NTServices" | Remove-SCOMManagementPack
Get-SCOMManagementPack -Name "Microsoft.SystemCenter.Apm.Wcf" | Remove-SCOMManagementPack
Get-SCOMManagementPack -Name "Microsoft.SystemCenter.Apm.Web" | Remove-SCOMManagementPack
Get-SCOMManagementPack -Name "Microsoft.SystemCenter.DataWarehouse.ApmReports.Library" | Remove-SCOMManagementPack
Get-SCOMManagementPack -Name "Microsoft.SystemCenter.Apm.Infrastructure.Monitoring" | Remove-SCOMManagementPack
Get-SCOMManagementPack -Name "Microsoft.SystemCenter.Apm.Library" | Remove-SCOMManagementPack

#APM Part 2 -- Need to remove secure reference override from "Microsoft.SystemCenter.SecureReferenceOverride" first

Get-SCOMManagementPack -Name "Microsoft.SystemCenter.SecureReferenceOverride" | Export-SCOMManagementPack -Path "c:\temp"
<# Delete

--Start

      <Reference Alias="SystemCenter3">
        <ID>Microsoft.SystemCenter.Apm.Infrastructure</ID>
        <Version>7.2.11719.0</Version>
        <PublicKeyToken>31bf3856ad364e35</PublicKeyToken>
      </Reference>

      <SecureReferenceOverride ID="SecureOverridec1bf9736_b0e5_bae6_06d5_cc04a9472e5f" Context="SystemCenter3!Microsoft.SystemCenter.Apm.DataTransferService" Enforced="false" SecureReference="SystemCenter1!Microsoft.SystemCenter.DataWarehouse.ActionAccount">
        <Value>0092C57E665DB6D9AE7FAD6FE9925AF96E41065C6000000000000000000000000000000000000000</Value>
      </SecureReferenceOverride>

--End
      #>
Import-SCOMManagementPack -Fullname "C:\Temp\Microsoft.SystemCenter.SecureReferenceOverride.xml"

#This will only work if you have removed the secure reference override
Get-SCOMManagementPack -Name "Microsoft.SystemCenter.Apm.Infrastructure" | Remove-SCOMManagementPack

For APM:  You will need to manually remove the Secure Reference Override before you can delete “Microsoft.SystemCenter.Apm.Infrastructure” mp.  Notes in are in the script as to what needs to be deleted.

My Core Environment:

Console

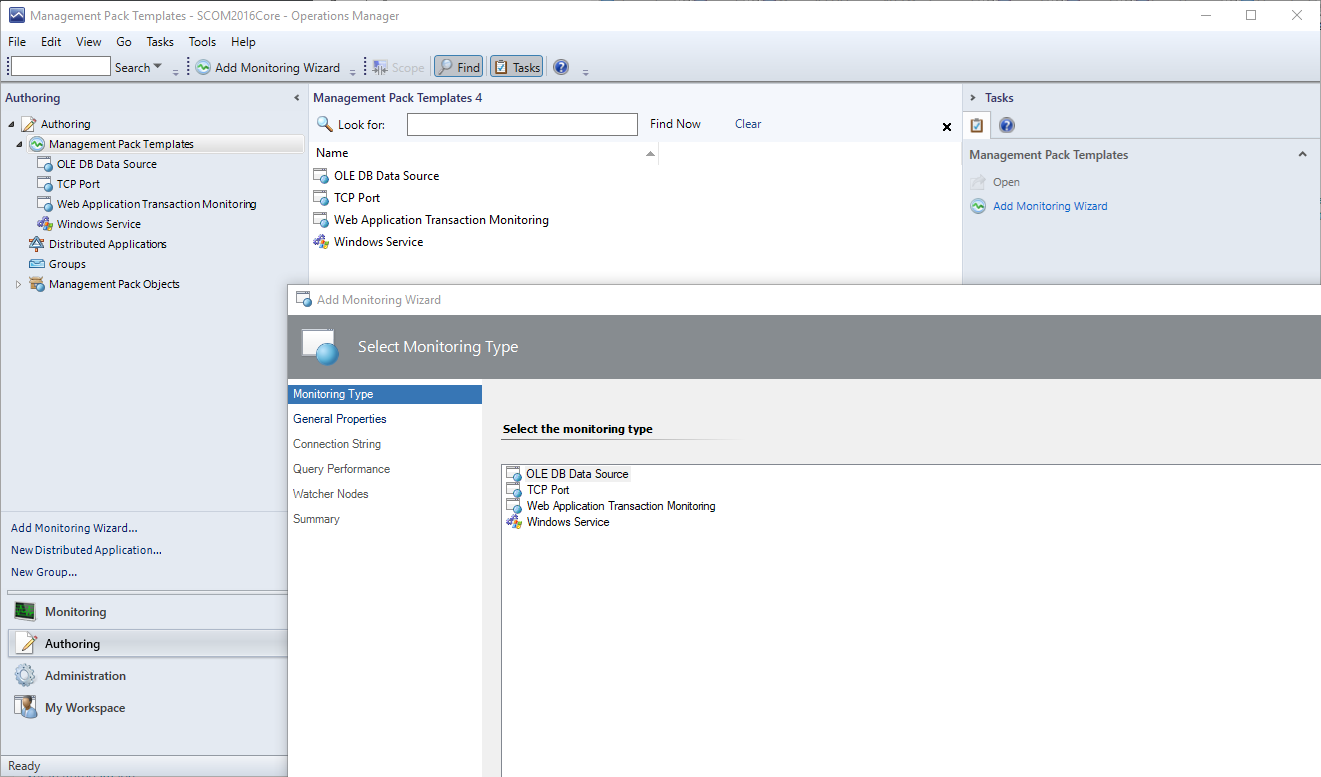
Authoring Wizard – Much cleaner

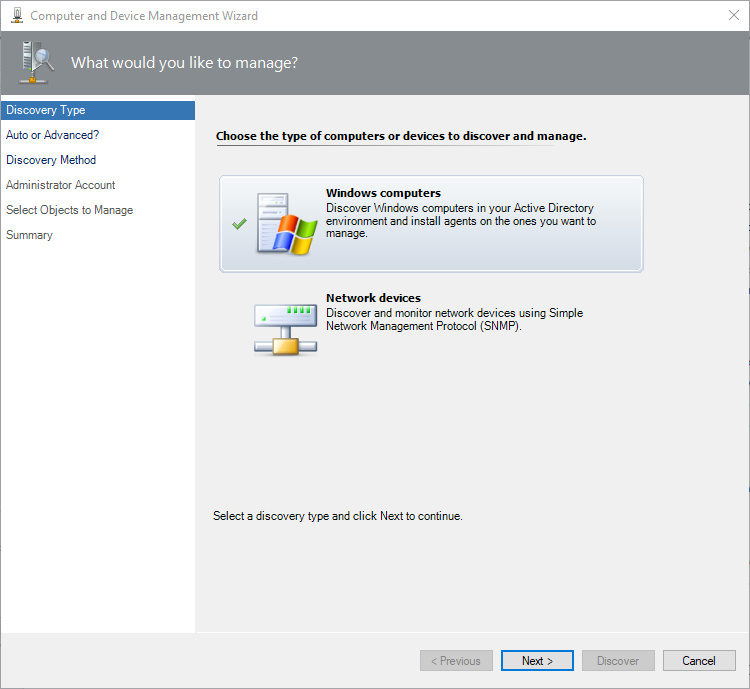
Discovery Wizard – Notice Unix is gone

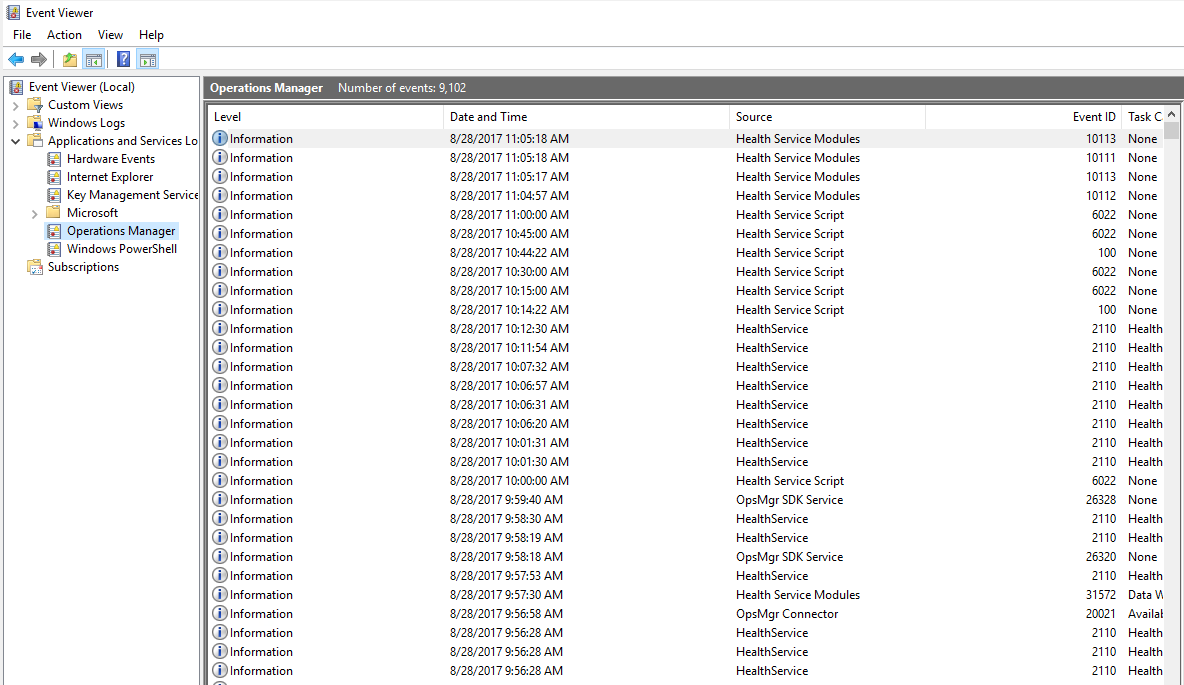
Event Logs – No errors

One of the most valuable management packs to remove would be the “System.NetworkManagement.Library” MP.  But removing this MP breaks the Windows Computer discovery wizard.

Any issues, comments or ideas for removing additional management packs please leave them in the comments.

Continue Reading

Sick of explaining to end users why they didn’t get a SCOM disk monitor alert?

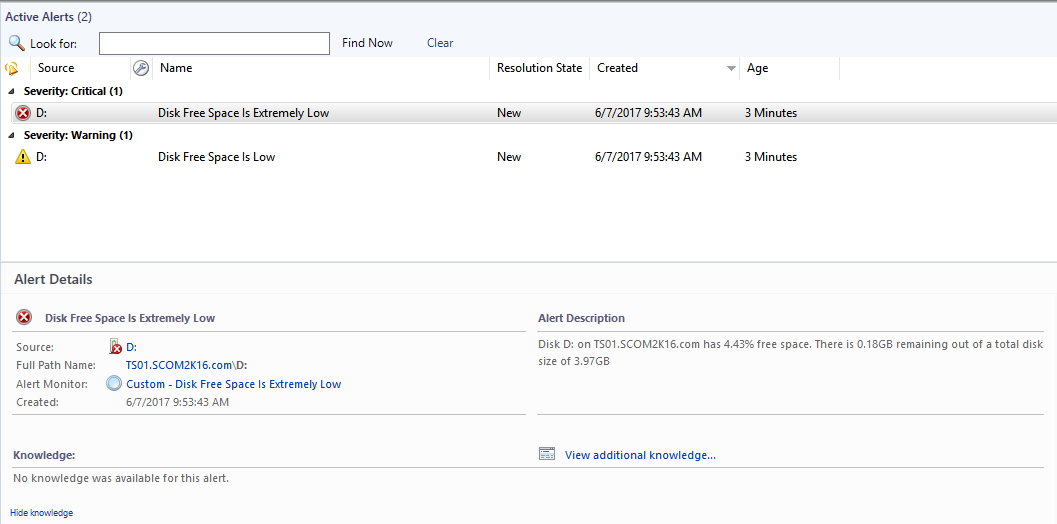
Are you sick and tired of explaining to end users why they didn’t get a disk space alert? The built in SCOM disk space monitors are way too complicated. There are thresholds for warning, critical, system drive, and non-system drive.  Then you must hit both percentage and megabyte thresholds. You can’t alert on warning because you won’t get a critical alert. What a mess!

Want to simplify your life? I have created two simple disk space monitors.

First: How to install them.

Download the MP here: https://www.scom2k7.com//downloads/Custom.Windows.Disk.Monitoring.zip

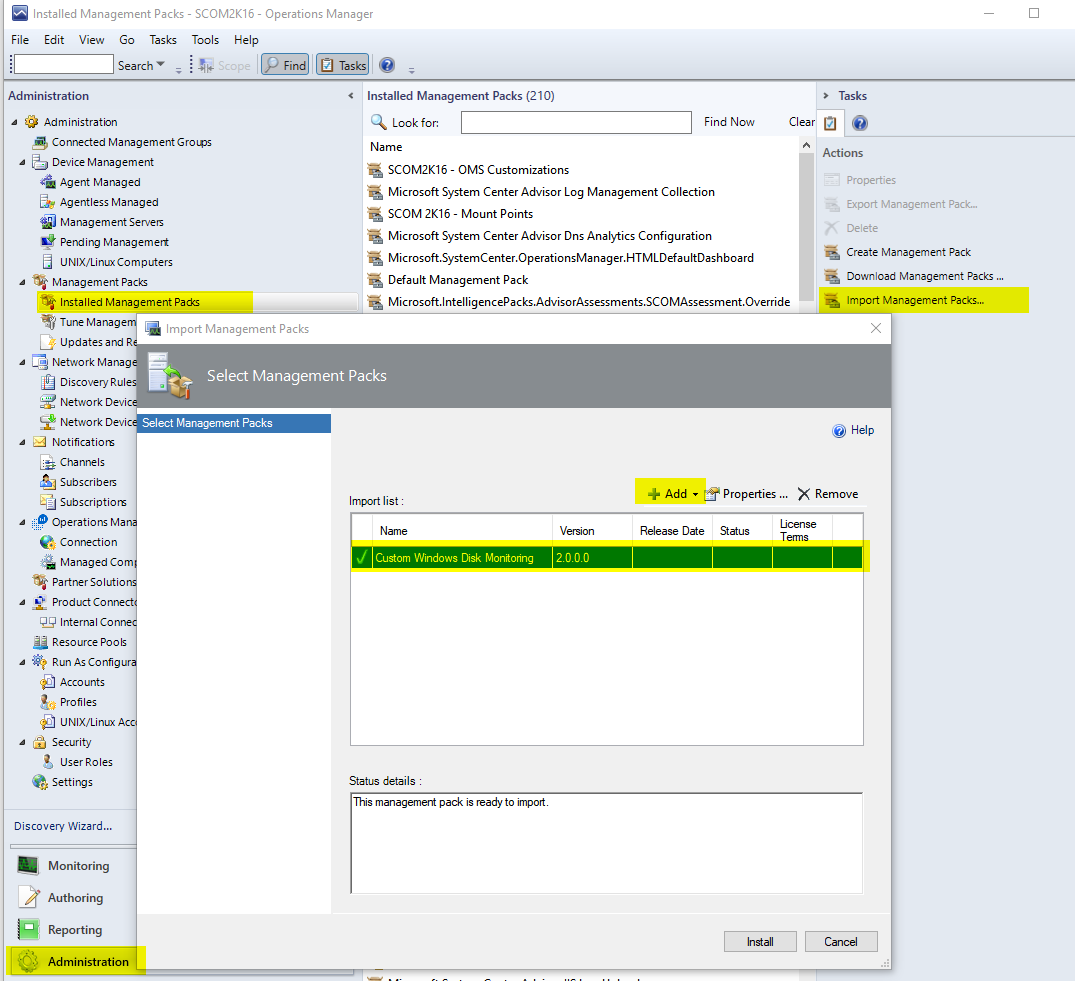
Import the Management Pack; Custom.Windows.Disk.Monitoring.mp  **Note: these require PowerShell to be installed on all your agent managed systems.  By default SCOM 2016 requires PowerShell on all systems.**


Next: Disable the built in monitors: Create overrides to disable the built in monitors.


That’s it.  Now end users will get an warning alert at 10% disk free space and a critical alert at 5% disk free space.  Simplicity Is Genius


Want to make your life even easier?   Check out the SCOM Maintenance Mode Scheduler


The Deets (Details)

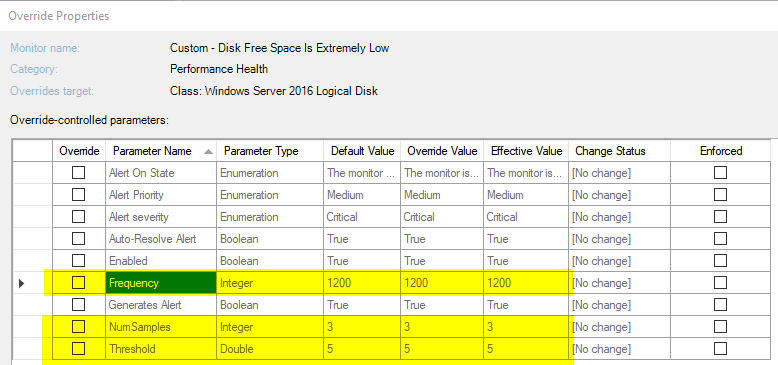
There are two new disk space monitors.  They work by collecting performance counters using the native modules.  When it detects 3 consecutive perfmon samples  over the threshold of 95% for the critical monitor (90% for the warning monitor) at a 20 minute interval.

If the drive is over the threshold for 60 minutes it will then launch a PowerShell script to clean up the percentage provided from perfmon from to a more readable number.  It will also query the drive for remaining GB free and the total size of the disk.  It displays this in the details of the alert.  This is much nicer then the built in ones that don’t tell you the size of the drive.

You can modify how these work by creating overrides.  You will need to create an overrides for each of the different classes.  Windows Server 2008 Logical disk, Windows Server 2012 Logical disk etc..

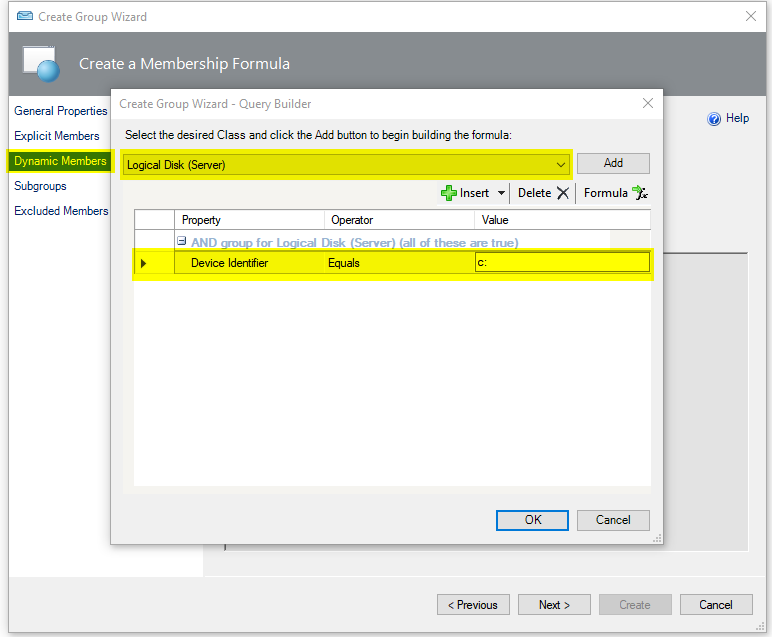
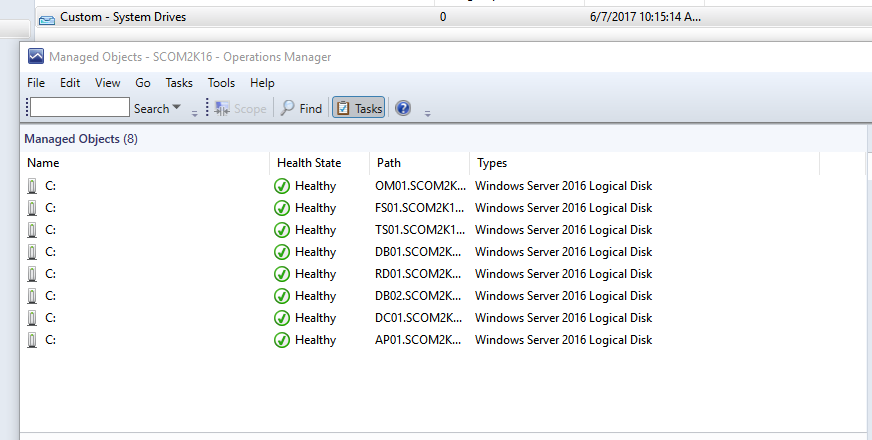
If you want to still have a separate threshold for your system drives.  You can simply create a dynamic group containing your c: drives.


Group Members


Then create overrides for the group.

Theses monitors were built using Kevin Holman’s excellent SCOM Management Pack VSAE Fragment Library. Monitor.Performance.ConsecSamples.ThenScript.TwoState.mpx


Please let me know if you find any bugs.  timmcfadden@scom2k7.com.com


Continue Reading

Monitoring Windows Server 2003 with SCOM 2016

First let me say this isn’t supported. But then again Windows Server 2003 is no longer supported anyways. Even if you have a Custom Support agreement, that just gives you the latest security hotfixes. Not support to monitor it with SCOM.

I have been to many customers recently that want to upgrade to SCOM 2016 but can’t because they have a significant number of systems still running Server 2003.

One option is to setup a new environment running SCOM 2012 R2 and move the old 2003 servers to the new environment. Then upgrade the existing environment with the majority of their servers to SCOM 2016. This creates more overhead keeping the two systems running and up-to-date.

Getting the Agents Working

You cannot install the SCOM 2016 agent on SCOM 2003 as the installer will fail.  But you likely already have a SCOM 2012 R2 Agent installed.  The differences in the SCOM Agent from SCOM 2007 to SCOM 2012 were major as we changed from XML 1.1 to XML 2.0 and included MP Binaries.  The changes from SCOM 2012 R2 to SCOM 2016 are relatively minor.

So, all we need to do is point the SCOM 2012 R2 Agent at SCOM 2016, right?  Maybe.

In my testing a Server 2003 system with a SCOM 2012 Agent, pointing at a SCOM 2016 management server went green but then went grey.

Why is this happening?  Many of the new management packs in SCOM 2016 require PowerShell.  By default, PowerShell is not part of the Windows Server 2003 OS.  To fix this follow these steps.


First we need to get WMI working.   Apply these Server 2003 hotfixes from Kevin’s list of recommended hotfixes.

932370 The number of physical hyperthreading-enabled processors or the number of physical multicore processors is incorrectly reported in Windows Server 2003
933061 WMI Stability in Server 2003
955360 Cscript 5.7 update for Server 2003


Then we first need .net 2.0 SP1 as it’s a prerequisite for PowerShell.

Download x64 Here:  https://www.microsoft.com/en-us/download/details.aspx?id=6041

Download x86 Here” https://www.microsoft.com/en-us/download/details.aspx?id=16614


Lastly we need to install the Windows Management Framework Core for Windows Server 2003

Download x64 Here: http://www.microsoft.com/downloads/details.aspx?familyid=909bbcf1-bd78-4e03-8c83-69434717e551

Download x86 Here: http://www.microsoft.com/downloads/details.aspx?familyid=f002462b-c8f2-417a-92a3-287f5f81407e


Now I can see the Windows Server 2003 Server is being monitored.

You may also want to disable the “Microsoft System Center Advisor Monitoring Server Opt-In/Out Rule” on these 2003 Systems as I have seen this fail.

Another helpful tool is to install Kevin Holman’s Agent Management Pack. https://blogs.technet.microsoft.com/kevinholman/2017/05/09/agent-management-pack-making-a-scom-admins-life-a-little-easier/

This management pack will help you identify which of your 2003 Systems are missing PowerShell.


Continue Reading

SQL Dashboards not populating with Event 26319

Custom with a large environment (7000+) agents was having issues with the SQL Dashboards not populating.  We checked the event log and came across this error.


Log Name: Operations Manager
Source: OpsMgr SDK Service
Event ID: 26319
Task Category: None
Level: Error
Keywords: Classic
User: N/A
Description:
An exception was thrown while processing GetDataWarehouseStoredProcedureResult for session ID
Exception message: Timeout expired. The timeout period elapsed prior to completion of the operation or the server is not responding.
Timed out stored procedure: sdk.Microsoft_SQLServer_Visualization_Library_GetDataCenterDashboardData
Full Exception: Microsoft.EnterpriseManagement.DataWarehouse.DataAccess.SqlTimeoutException: Timeout expired. The timeout period elapsed prior to completion of the operation or the server is not responding.
Timed out stored procedure: sdk.Microsoft_SQLServer_Visualization_Library_GetDataCenterDashboardData —> System.Data.SqlClient.SqlException: Timeout expired. The timeout period elapsed prior to completion of the operation or the server is not responding. —> System.ComponentModel.Win32Exception: The wait operation timed out


The fix:

When used rarely or after a long break, the dashboards may work rather slowly due to large amounts of the collected data to be processed; especially, it is related to large environments (2000+ objects).

Run this script in SQL against your DataWarehouse

USE [OperationsManagerDW]
EXECUTE [sdk].[Microsoft_SQLServer_Visualization_Library_UpdateLastValues]
EXECUTE [sdk].[Microsoft_SQLServer_Visualization_Library_UpdateHierarchy]


Continue Reading

SCOM 2016 Maintenance Mode Scheduler

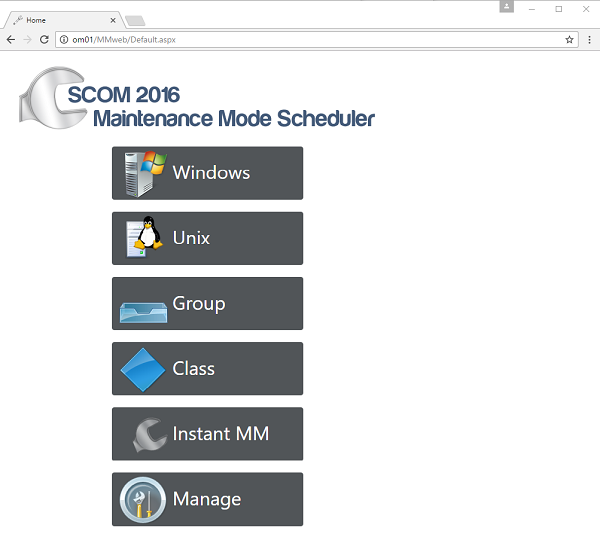
The SCOM 2016 Maintenance Mode Scheduler application makes enabling and scheduling maintenance mode simple for all users. Your IT staff will no longer have a reason why a server wasn’t put into maintenance mode.

The application is an intuitive HTML5 interface written specifically for SCOM 2016 and SCOM 1801 from the ground up. It deeply integrates into SCOM 2016 using all the new native maintenance mode scheduling capabilities. All your IT staff can quickly schedule maintenance mode without having to install and use the slow console.

Features:

  • Easily access the new web based maintenance mode scheduler from any browser (Chrome, FireFox, Safari and IE)
  • Schedule Windows/Unix Computers, Groups, and Objects like SQL Databases for maintenance in a few seconds.
  • Import a CSV containing a list of computers or groups for scheduled maintenance.
  • Instant MM: Server and application admins can instantly place servers into maintenance during reboots and maintenance windows directly from the server without requiring admin privileges to the server.
  • Instant MM can be called by a VB, PowerShell, or code from anywhere. This can be used to start and stop maintenance on any server for a specified amount of time. This makes it easy to integrate into your current change or software management process.

Download

Additional Features:

  • Integrated Dashboard works in the SCOM Console.
  • Instant Maintenance Mode with URL Parameters.  Specify URL parameters ComputerName, ID, Min, Action to control maintenance mode.
  • Manage page will make it easy to see and manage any upcoming maintenance windows and identify any gaps
  • Uses the same role based permissions that SCOM 2016 uses. Users will only be able to schedule maintenance mode for servers, groups, or objects they already have access to in SCOM.

Schedule Windows Computers

Instant MM

This solution makes it easy for IT staff to put a server into maintenance mode without having to go to the SCOM console. On any server, the administrator can visit the SCOM 2016 Maintenance Mode Scheduler Instant MM website at http://yourMSserver/MMWeb/InstantMM.aspx

Create a shortcut on the desktop of the servers to make it even easier. This can be accomplished manually or by use SCCM, AD Group Policy or some other software deployment software

Integrated Dashboard

Instant Maintenance Mode with URL Parameters

New in SCOM Maintenance Mode Scheduler 2016 is the ability to add parameters to the URL.

  • ComputerName – Specify the Computer Name
    http://yourMMServer/MMweb/Instant.aspx?ComputerName=yourComputer.yourdomain.com
  • ID: – Specify the ID of any object in SCOM
    http://om01/MMweb/InstantMM.aspx?ID=f4ea533c-16e4-76fa-8f5a-98fc4b1cb492
  • Min – Number of Minutes for Maintenance Mode
    http://om01/MMweb/InstantMM.aspx?Min=120
  • Action – Start or Stop Maintenance Mode
    http://om01/MMweb/InstantMM.aspx?Action=Start
    http://om01/MMweb/InstantMM.aspx?Action=Stop
  • Combine multiple URL Parameters
    http://om01/MMweb/InstantMM.aspx?ComputerName=DB02.scom2k16.com&Min=120&Action=Start

Instant Maintenance Mode using PowerShell, VBScript or Code.

Using the new URL Parameters, you can now put servers into Maintenance Mode from any computer using a script or code.  Typical use case would be using SCCM when updates or software is installed.  SCCM would execute the VB or PowerShell script before the install process to start maintenance mode.  After the updates or software is installed SCCM would call the script to stop maintenance mode.

VB Script Example    Download: https://www.scom2k7.com/downloads/computerMM.renameTOvbs

Dim o, mmServer, computerName, min, action, fullURL
if WScript.Arguments.Count < 4 then
    WScript.Echo "Missing parameters"
end If

mmServer = WScript.Arguments(0)
computerName = WScript.Arguments(1)
min = WScript.Arguments(2)
action = WScript.Arguments(3)

Set o = CreateObject("MSXML2.XMLHTTP")
'Example http://om01/MMweb/InstantMM.aspx?ComputerName=DB02.scom2k16.com&Min=120&Action=Start
fullURL = "http://" & mmServer & "/MMweb/instantMM.aspx?ComputerName=" & computerName & "&Min=" & min & "&Action=" & action
WScript.Echo fullURL

o.open "GET", fullURL, False
o.sen


PowerShell Example     Download: https://www.scom2k7.com/downloads/computerMM.renameTOps1

param (
    [Parameter(Mandatory=$true)][string]$mmServer,
    [Parameter(Mandatory=$true)][string]$computerName,
    [Parameter(Mandatory=$true)][string]$min,
    [Parameter(Mandatory=$true)][string]$action
 )

$FullURL = "http://" + $mmServer + "/MMweb/InstantMM.aspx?ComputerName=" + $computerName + "&Min=" + $min + "&Action=" + $action
$FullURL

Invoke-Webrequest -uri $FullURL -UseDefaultCredential

Any problems, bugs, or issues please e-mail:  support@scom2k7.com.com

Continue Reading

SCOM 2016 Scheduled Maintenance Mode won’t run if you picked a different database name during install

There is a bug in SCOM 2016 where if you choose a different Operations Manager Database Name during install, schedule maintenance mode won’t work!

The Jobs will run but nothing is put into Maintenance Mode. You won’t get an error in SCOM or in the event log.

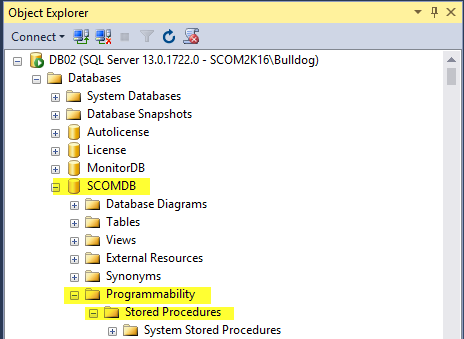
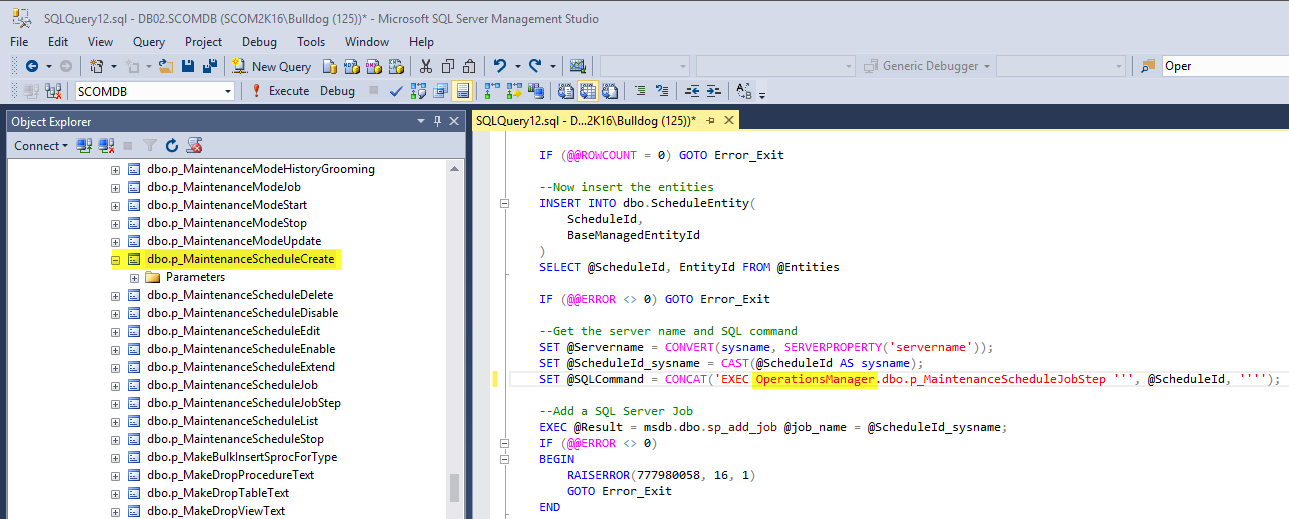
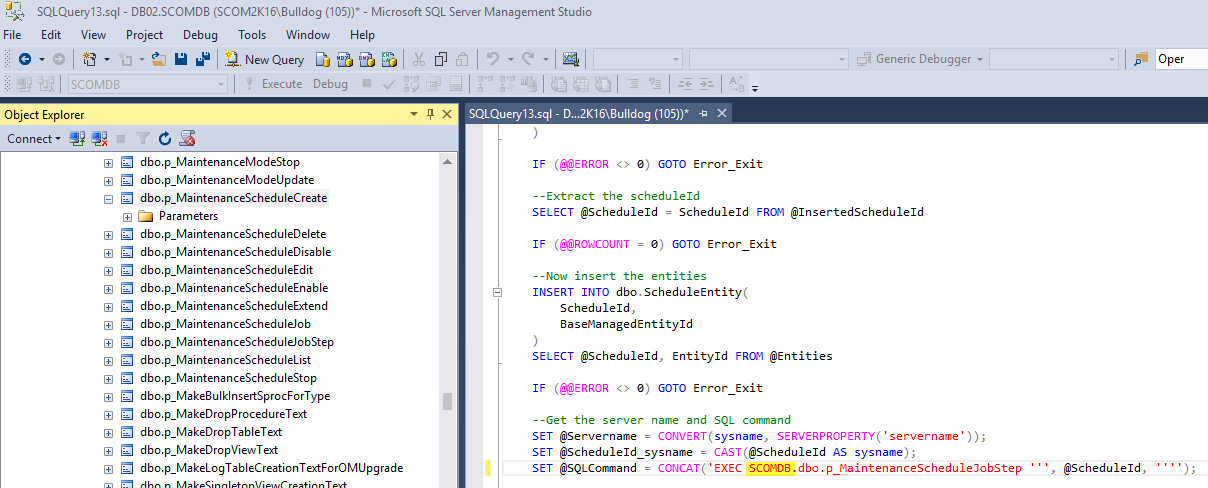
As you can see below I named my “OperationsManager” Database “SCOMDB”

The stored procedure has ‘OperationsManager’ hard coded as the Database name so it fails!

The workaround is to change the stored procedure that creates these Schedules.

The stored procedure name is p_MaintenanceScheduleCreate

Right click Modify.

Find the line

	SET @SQLCommand = CONCAT('EXEC OperationsManager.dbo.p_MaintenanceScheduleJobStep ''', @ScheduleId, '''');


and change OperationsManager to your database name and click Execute

You will have to delete all your Schedules in the console.

Now they run without issue.

This is a known bug and will be fixed in SCOM 2016 UR3.


Continue Reading

Identify SCOM Agent Version from the file system on SCOM 2012 R2 and SCOM 2016 Agents

When writing my SCOM Agent Update MP  I needed a way to get the SCOM Agent version from the file system.  There is one file that gets updated in every Update Rollup.  OMAgentTraceTMFVer.Dll that is located where in the \Tools\TMF directory where you installed the scom agent.  In my case C:\Program Files\Microsoft Monitoring Agent\Agent\Tools\TMF\OMAgentTraceTMFVer.Dll

I wrote this script to read the file version of this file to identify agent installed version.

Here is a similar VBscript that will pull that data. It works with SCOM 2012 R2 and SCOM 2016

Set objShell = WScript.CreateObject("WScript.Shell")
sngVersion = objShell.RegRead("HKLM\SOFTWARE\Microsoft\Microsoft Operations Manager\3.0\Setup\InstallDirectory")

Set objFSO = CreateObject("Scripting.FileSystemObject")
fileVer = objFSO.GetFileVersion(sngVersion & "Tools\TMF\" & "OMAgentTraceTMFVer.Dll")


select case fileVer
   case "7.1.10184.0"
      urVersion = "RTM"
      agentVersion = "2012 R2"
   case "7.1.10195.0"
      urVersion = "UR2"
      agentVersion = "2012 R2"
   case "7.1.10204.0"
      urVersion = "UR3"
      agentVersion = "2012 R2"
   case "7.1.10211.0"
      urVersion = "UR4"
      agentVersion = "2012 R2"
   case "7.1.10213.0"
      urVersion = "UR5"
      agentVersion = "2012 R2"
   case "7.1.10218.0"
      urVersion = "UR6"
      agentVersion = "2012 R2"
   case "7.1.10229.0"
      urVersion = "UR7"
      agentVersion = "2012 R2"
   case "7.1.10241.0"
      urVersion = "UR8"
      agentVersion = "2012 R2"
   case "7.1.10268.0"
      urVersion = "UR9"
      agentVersion = "2012 R2"
   case "7.1.10285.0"
      urVersion = "UR11"
      agentVersion = "2012 R2"
   case "8.0.10918.0"
      urVersion = "RTM"
      agentVersion = "2016"
   case "8.0.10931.0"
      urVersion = "UR1"
      agentVersion = "2016"   
case Else
      urVersion = "Unknown"
end select 

wscript.echo "Agent Version: " & agentVersion
wscript.echo "UR: " & urVersion


Here is the script in Powershell.   Modified from Kevin’s Agent Management Pack.  https://blogs.technet.microsoft.com/kevinholman/2017/05/09/agent-management-pack-making-a-scom-admins-life-a-little-easier/

function URVersion($Version)
{
  switch($Version)
  {
    # SCOM 2012
    "7.1.10184.0" {"2012 R2 RTM"} 
    "7.1.10195.0" {"2012 R2 UR2"} 
    "7.1.10204.0" {"2012 R2 UR3"} 
    "7.1.10211.0" {"2012 R2 UR4"} 
    "7.1.10213.0" {"2012 R2 UR5"} 
    "7.1.10218.0" {"2012 R2 UR6"} 
    "7.1.10229.0" {"2012 R2 UR7"} 
    "7.1.10241.0" {"2012 R2 UR8"} 
    "7.1.10268.0" {"2012 R2 UR9"} 
    "7.1.10285.0" {"2012 R2 UR11"} 
    "7.1.10292.0" {"2012 R2 UR12"} 
    "7.1.10302.0" {"2012 R2 UR13"} 
    "7.1.10305.0" {"2012 R2 UR14"} 				

    # SCOM 2016
    "8.0.10918.0" {"2016 RTM"} 
    "8.0.10931.0" {"2016 UR1"} 
    "8.0.10949.0" {"2016 UR2"} 
    "8.0.10970.0" {"2016 UR3"} 
    "8.0.10977.0" {"2016 UR4"} 				
  }
}
                        			
$SCOMRegKey = "HKLM:\SOFTWARE\Microsoft\Microsoft Operations Manager\3.0\Setup"
$SCOMPath = (Get-ItemProperty $SCOMRegKey).InstallDirectory
$SCOMPath = $SCOMPath.TrimEnd("\")

$AgentURFile = Get-Item $SCOMPath\Tools\TMF\OMAgentTraceTMFVer.Dll
$AgentURFileVersion = $AgentURFile.VersionInfo.FileVersion
$AgentURLevel = URVersion $AgentURFileVersion
$AgentURLevel


Continue Reading